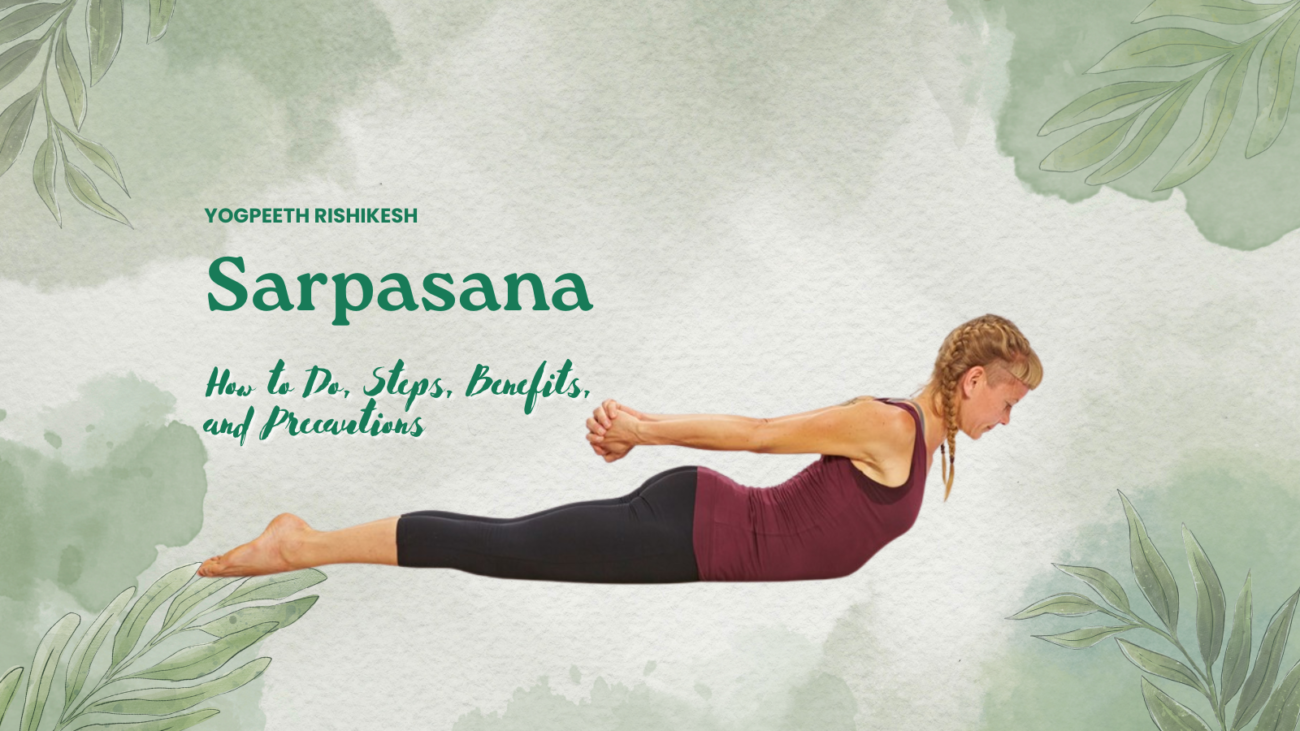
Sarpasana, also known as the Snake Pose, is a powerful yoga asana that helps improve spinal flexibility, strengthen back muscles, and enhance digestion. This asana is often compared to Bhujangasana (Cobra Pose), but there are significant differences between the two. Practicing Sarpasana yoga regularly can improve posture, release tension, and stimulate energy flow throughout the body.
In this detailed guide, we’ll explore:
- How to Perform Sarpasana (Snake Pose) Correctly
- The Top 5 Benefits of Sarpasana
- Key Differences Between Sarpasana and Bhujangasana
- Precautions & Common Mistakes to Avoid
Let’s dive in and discover how this ancient yoga posture can transform your practice!
What is Sarpasana?
Sarpasana, derived from the Sanskrit words ‘Sarpa’ (snake) and ‘Asana’ (posture), mimics the stance of a rising cobra. It is a backbend yoga asana that strengthens the spine, relieves back pain, and improves overall flexibility.
This pose is a vital part of Hatha Yoga and is often practiced in Top Yoga Schools in Rishikesh, including those offering 200 Hour Yoga Teacher Training in Rishikesh and Pre-Natal Yoga Teacher Training in Rishikesh.
Sarpasana vs. Bhujangasana: What’s the Difference?
Many people confuse Sarpasana with Bhujangasana (Cobra Pose), but they have different effects on the body.
| Aspect | Sarpasana (Snake Pose) | Bhujangasana (Cobra Pose) |
|---|---|---|
| Arm Support | No hand support; the chest is lifted using back strength | Uses hands for support while lifting the chest |
| Muscle Engagement | Engages lower back, core, and glutes | Focuses on upper back and shoulders |
| Difficulty Level | Intermediate | Beginner-friendly |
| Flexibility Requirement | Higher | Moderate |
| Breathing Focus | Deep inhalation and exhalation for energy flow | Controlled breathing for relaxation |
Both Sarpasana and Bhujangasana have their own benefits, but Sarpasana requires more core strength and flexibility.
How to Do Sarpasana (Snake Pose) – Step-by-Step Guide
Follow these Sarpasana steps carefully to ensure proper alignment and avoid injuries:
Step 1: Starting Position
- Lie down on your stomach (prone position).
- Keep your legs extended straight, with toes pointing outward.
- Place your hands on the floor beside your body.
Step 2: Engage the Core & Lift the Chest
- Inhale deeply and lift your chest and upper body using only your back muscles.
- Keep your arms stretched back, parallel to the ground.
- Engage your glutes, lower back, and core muscles to maintain balance.
Step 3: Hold the Pose
- Keep your gaze forward and breathe slowly and deeply.
- Hold for 20-30 seconds (beginners) or 1 minute (advanced practitioners).
Step 4: Exhale and Release
- Exhale slowly and bring your chest down to the mat.
- Rest for a few breaths before repeating.
Sarpasana Variations for Different Levels
✔ Beginner: Hold the pose for 10 seconds and gradually increase.
✔ Intermediate: Try lifting the legs slightly off the ground for deeper engagement.
✔ Advanced: Combine Sarpasana with Rajju Karshanasana (Rope-Pulling Pose) to improve arm and core strength.
Top 5 Sarpasana Benefits
1. Strengthens the Spine & Reduces Back Pain
- Engages lower back muscles to provide natural pain relief.
- Improves posture and spinal alignment.
2. Enhances Flexibility & Posture
- Stretches the chest, shoulders, and abdomen, improving upper body flexibility.
- Helps correct slouching posture from prolonged sitting.
3. Boosts Digestion & Organ Function
- The gentle compression on the abdomen stimulates the digestive organs.
- Aids digestion, reduces bloating, and detoxifies the liver.
4. Improves Blood Circulation & Energy Flow
- Promotes better oxygen flow, keeping muscles energized.
- Helps reduce stress, anxiety, and fatigue.
5. Tones the Abdominal & Core Muscles
- Strengthens the core, glutes, and lower back.
- Improves metabolism and aids weight management.
Precautions & Contraindications of Sarpasana
While Sarpasana yoga is highly beneficial, it should be practiced with caution.
✔ Who Should Avoid Sarpasana?
- People with severe back injuries or herniated discs.
- Pregnant women (opt for gentler poses like Purna Chandrasana).
- Those suffering from high blood pressure or recent abdominal surgery.
✔ Common Mistakes to Avoid
Using hand support – Remember, Sarpasana requires core and back engagement, not arm support.
Overarching the lower back – Keep a neutral spine to prevent strain.
Holding the breath – Deep, controlled breathing is essential for energy flow.
FAQs About Sarpasana (Snake Pose)
1. What Are the Benefits of Sarpasana?
✔ Strengthens the spine, core, and glutes.
✔ Improves digestion and blood circulation.
✔ Helps in stress relief and mental clarity.
✔ Enhances flexibility and posture.
2. What is the Difference Between Sarpasana and Bhujangasana?
✔ Sarpasana is more advanced and requires no hand support.
✔ Bhujangasana is easier and uses arm strength for the lift.
3. What Are the Precautions for Sarpasana?
✔ Avoid if you have severe spinal issues or pregnancy.
✔ Perform under a certified yoga teacher for safety.
✔ Ensure proper warm-up before attempting the pose.
4. What Does Snake Pose Do?
✔ Improves spinal flexibility.
✔ Enhances digestion and relieves bloating.
✔ Boosts core strength and metabolism.
Conclusion: Why You Should Add Sarpasana to Your Yoga Routine
Whether you are a beginner or an advanced yogi, incorporating Sarpasana (Snake Pose) can greatly enhance your flexibility, strength, and overall well-being. This pose is widely practiced in Best Yoga Schools in Rishikesh and is a part of 200 Hour Yoga Teacher Training in Rishikesh and Pre-Natal Yoga Teacher Training in Rishikesh.
By practicing Sarpasana correctly, avoiding common mistakes, and understanding its key benefits, you can unlock a stronger, healthier body and mind.
Ready to deepen your yoga journey? Join a certified yoga training course in Rishikesh and experience the true power of traditional yoga!